
OEM buyer guide · Reviewed 5 September 2026
A custom tool roll or tool bag should be developed around the equipment it carries and the way it is used—not around a pocket count or a fabric label. Start with the real kit, then resolve retention, access, loaded shape, carrying and protection before approving the production specification.
This guide helps brand owners, product developers and sourcing teams prepare an OEM request for sewn tool storage. The framework applies to workshop kits, field-service equipment, outdoor repair sets and vehicle-carried tools. It is a development method, not evidence that any illustrated construction has passed a load test or is suitable for a particular vehicle.
1. Choose a format by the working sequence
A roll lays out a set of tools visibly and packs into a relatively flexible shape. A zippered tool bag can accommodate mixed shapes and provide a contained carrying space. Removable pouches make it easier to separate small kits, while a structured case can define more controlled compartments. None is automatically the best solution: the choice depends on where the kit is opened, how often tools are removed and how it returns to storage.
Write the sequence from arrival to pack-away. Does the user unroll the kit on a bench, kneel beside a vehicle or carry one pouch away from a larger bag? Must tools remain in assigned positions while the carrier is partly open? Is there a clean surface available? These answers reveal whether a flat opening, hanging arrangement, removable insert or compact zipped enclosure is worth prototyping.
| Format | Useful starting point | Question to prove with a sample |
|---|---|---|
| Tool roll | Visible organisation of a defined kit | Will every item remain retained when rolled and carried? |
| Zippered tool bag | Mixed-size equipment in one enclosure | Can the largest item pass through the opening without forcing it? |
| Modular pouches | Separating tasks or small components | Can users identify and secure each pouch in the main carrier? |
| Structured sewn case | Controlled shape and separated contents | Does the support remain practical when loaded, carried and stored? |
2. Build the contents schedule before the pocket layout
Provide a numbered equipment list with actual dimensions, weight and quantity. Include bulky handles, projecting fittings and protective caps. Photograph the kit beside a scale reference and identify which items may change between versions. A pocket made around a flat photograph can be too shallow once the real tool thickness and hand access are included.
Record sharp edges, oily surfaces, delicate displays and loose components separately. A sewn pocket is not inherently a puncture barrier, and a padded compartment does not establish a shock-protection rating. Where a tool requires its own guard or protective case, keep that requirement visible in the layout review rather than assuming the outer bag replaces it.
Distinguish a fixed kit from an expandable kit. For a fixed kit, each pocket can follow a controlled item reference. For variable equipment, agree the largest and smallest intended contents and evaluate practical adjustment. Avoid making all pockets oversized merely to accommodate future uncertainty; loose contents can change both access and retention.
3. Size the finished pocket, not just the flat panel
Specify usable internal width, depth and opening separately from the cutting pattern. Seam allowances, binding, material thickness, folded corners and dividers consume space. The first pattern must allow for this construction, and the sample must confirm that the user can insert and remove the intended item without catching the edge or disturbing neighbouring tools.
For a roll, check the complete loaded bundle. Thick tools placed side by side can create a much larger rolled diameter than the empty prototype suggests. Locate the fold lines, flap overlap and strap route with the real kit inside. Compare full and partial loading: a closure that works only with every pocket filled may not be useful in daily work.
4. Make retention and closure separate decisions
A strap holding the roll closed does not necessarily retain individual tools. Review pocket depth, flap coverage, elastic loops, zippered compartments and other retaining features against the actual item. Record which direction a tool could escape when the carrier is lifted or rotated. The review should include the partly closed state, not only a neatly packed presentation.
Keep the opening route clear of lining, loose thread ends and overfilled pockets. YKK’s zipper-use guidance warns that forcing an overfilled bag closed can damage the elements or tape. For development, this means checking capacity and access as well as selecting a zipper; a larger fastener alone does not correct an unsuitable opening.
Confirm how the user operates the closure with the clothing or gloves expected in the use case. Pull-tab size, slider access and the position of strap ends should be assessed on the sample. A zipper slider, its pull tab and the zipper tape are distinct components and should be named separately in a bill of materials.
5. Trace the load from tools to the carrying points
Loaded weight passes through the base or pockets, connecting seams, reinforcement and handle or strap anchors. Review this complete path. A heavy outer fabric does not by itself establish carrying capacity, and adding stitching without evaluating the panel and anchor construction can leave the underlying weakness unchanged.
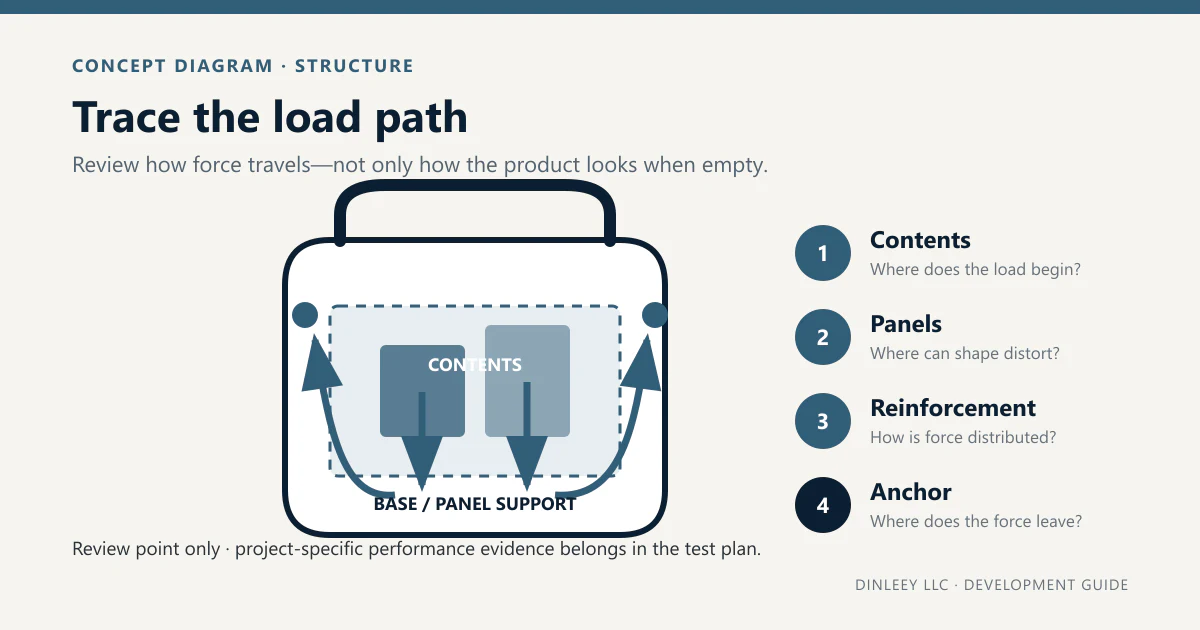
Record how reinforcement terminates, how it is held in position and whether its edges create concentrated wear. A stiffener that supports a base may also reduce folding convenience or complicate cleaning. Coats’ luggage application guidance highlights the role of sewing thread and zipped openings in durable construction. Component selection is one input; the finished bag still needs a project-specific review.
Agree the intended contents and load condition before planning tests. Do not copy a load figure from another bag or treat a successful hand lift as a rated-load certification. Acceptance criteria need to state the method, loading, repetitions where relevant, inspected areas and conditions that require rejection.
6. Specify a material system for the exposure
Describe contact with workshop dust, moisture, oils, cleaning products, vehicle trim or outdoor surfaces. Then compare the outer material, pocket lining, padding, reinforcement, thread, webbing and hardware as one assembly. Material names and fabric weight are useful identifiers, but neither describes every behaviour of a finished carrier.
Ask which surface must resist abrasion, which must be easy to wipe and which must avoid marking the contents or its surroundings. Separate water-resistant material from a claim about the complete bag. Stitch holes, seams and openings need review before any water-protection claim is made. Chemical compatibility and colour transfer likewise require evidence appropriate to the selected materials and intended contact.
Resolve the structure and material direction before expanding colour and branding variants. A plain first prototype can expose fit, access and folding problems more clearly. Production colour selection should reference agreed physical swatches and component availability, not a screen image alone. Record whether colour or logo changes would require another material or construction check.
7. Define storage interfaces without inventing vehicle fit
If a kit will be stored inside a vehicle, provide the storage envelope, access direction, surrounding surfaces and any permitted attachment points. Confirm clearance with adjacent moving parts in the actual intended installation. A product described as compact or vehicle-friendly is not thereby validated for a particular model or location.
Keep a storage bag separate from a safety restraint. Do not assume that carrying straps, pocket flaps or ordinary bag closures are crash-rated securing devices. Installation, restraint and safety requirements need their own project-specific review. Do not place a developing accessory where it can obstruct controls, visibility or safety systems.
8. Use prototypes to answer named questions
Give each prototype a purpose: layout and contents fit; loaded handling and closure; material and construction review; or the agreed production-reference stage. Photograph the same views with the same equipment set so changes can be compared. Mark the revision, what changed and what remains open.
- Check each tool against its assigned pocket and the stated access sequence.
- Review loaded and partially loaded shape, flap overlap and strap adjustment.
- Inspect contact edges, internal dividers, seam appearance and reinforcement position.
- Apply the agreed handling or environmental checks and record the method and observations.
- List unresolved items with an owner before moving to the next stage.
The product test-plan guide helps organise verification, while the sample-approval guide helps control the decision to advance a revision. Neither turns an untested concept into an approved production specification.
9. Prepare a comparable OEM quotation request
Send the same kit schedule, drawing or reference, material direction, order quantities, packaging requirement and revision to each shortlisted supplier. Ask the quotation to identify assumptions and excluded items. Comparing prices against different pocket layouts, reinforcement or packing methods is not a like-for-like comparison.
Separate prototype charges, any special-component development, unit prices and transport assumptions. Confirm the delivery basis and destination before comparing logistics. A rolled or collapsible design may have a different packed volume from a rigid structure; the actual packed sample is the basis for a reliable packing review, not the external dimensions of an empty sketch.
Do not treat a general guide as a promise of price, minimum quantity or lead time. Those terms depend on the product and must be confirmed for the specific project. Before production, align the approved reference, bill of materials, permitted substitutions, labels, packaging and inspection criteria.
Questions buyers often ask
Can development start with a concept rather than a finished drawing?
Yes. Start with the intended kit, use sequence, size constraints and open decisions. A concept can begin the discussion, but the missing dimensions and acceptance requirements still need to be resolved through development.
Does a heavy fabric prove a tool bag’s load capacity?
No. The contents, panels, seams, reinforcement, handles and anchors form a system. A load claim needs an agreed finished-product test and supporting evidence.
Should the first prototype include all colour and logo options?
Not normally. First resolve the layout, loaded shape, access and closure. Confirm the production material, colour and branding references at the appropriate later review stage.
Prepare your tool-storage development brief
Share the equipment list, dimensions and weights, photographs, working sequence, carrying or storage conditions, material direction, quantity range and the decisions still open. DINLEEY develops custom sewn storage and protective accessories around those inputs.
Discuss a custom tool roll or tool bag → · Explore functional sewn bags · Plan the material specification
Please send only material you are authorised to share. Confidential drawings and commercial terms should follow an agreed project process.
Email: info@dinleey.com
Send a sketch or reference image, estimated quantity and target market.